Photoshopping with Gimp ... and with Jason of Foxtrot :)
The GIMP GUI
Basics
- Layers
- Zooming in/out
- Selecting things
- Selecting irregular shapes
- Moving selections, layers, etc.
- Scaling (resizing: growing or shrinking)
- Transforms (rotations, flips, distortions)
- Cropping
- Masks
- Brushes
- Description of filters
Common tasks
- Lasso & magic wand selection
- Path tool selection
- Create a new layer with transparency
- Create a layer mask from a selection
Fun stuff
- How to cut out a part of an image and paste it in another image
- How to give an image a transparent background
- Alternate method for images with LOTS of fine detail (like messy hair with lots of strands)
- How to take a snap-shot of a window on the desktop
- How to turn a person into a zombie
- How to create a 3-D pop-out image
- How to make a transparent web page background texture
- How to fade-out the edges of an image
- How to make stylish buttons
- How to make a userbar or navbar
- How to make a grainy video effect animated gif
- How to make amazing and stylish logos
Excellent online tutorials (these sites seem to go up and down...)
- gimp-tutorials.com
- gimp-tutorials.net
- [GUG] Tutorials (can select the GIMP version want tutorials for; we're using 2.0)
The GIMP home site
- Home page
- Download GIMP
- Documentation for the version we're using
Overview of the GIMP GUI
- The GIMP GUI is a multi-window GUI
- This is different than Photoshop which puts all/most of its controls in one window
- This allows easily only showing the components you want to see.
- The main parts of the GIMP GUI are:
- The Toolbox
- The image window
- The Layers dialog
[top]
The GIMP Toolbox
- If you can't locate the toolbox, you can activate it by selecting Tools->Toolbox
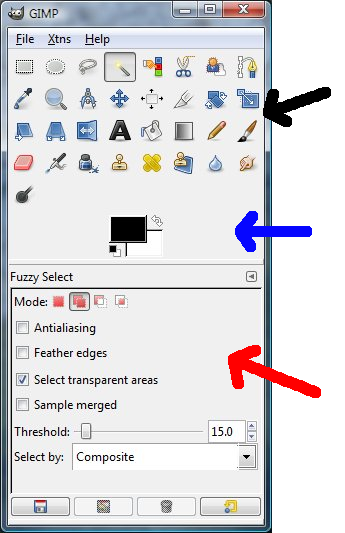
- The top half of the Toolbox contains all the tool buttons (black arrow above)
- The bottom half contains the options section for the currently selected tool (red arrow above)
- The middle section contains the foreground/background color selection tool (blue arrow above)
[top]
The image window
- The image window displays the image you are working with:
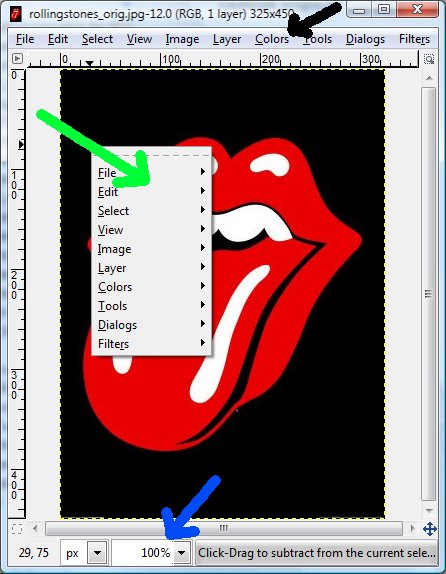
- At the top is the main menu bar for GIMP (black arrow above)
- In this guide, any reference to a menu bar item (for instance Edit->Paste) refers to this menu bar
- You can right-click on the image to get to the menu list (green arrow above)
- Doing this, each of the pop-up menu windows has a dashed line at the top
- If you click on the dashed line, it makes the pop-up menu open permanently as a new dialog
- If there is a submenu that you are frequently using, pull it off as a permanent dialog for ease of use
- At the bottom is a zoom selection pull-down list (blue arrow above)
[top]
The Layers dialog
- The Layers dialog is one of the most important dialogs; it completely controls all the layers of your image
- To activate the Layers dialog, hit CTRL-L or select Dialogs->Layers
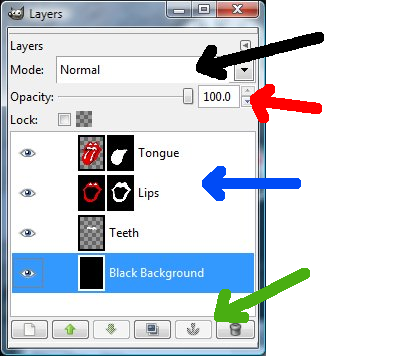
- The main parts of the dialog are:
- Layer mode selection (black arrow above)
- Opacity control (red arrow above)
- Layers stack (blue arrow above)
- Button controls (green arrow above)
- Lists all the layers as a stack, top most visible over the others below it
- Allows deleting, duplicating, and creating new layers
- Allows adding a layer mask
- Allows name a layer
- Allows changing the opacity ... make it solid or see-through (transparent)
- Allows setting the layer mode (for instance merge with lower layers - "multiply")
- Changing the order of layers in the stack
[top]
Layers
- Think of layers as clear plastic pages on which you can draw different pieces of the picture and then stack to get the full, cumulative effect.
- You can take away a layer and remove that part of the image.
- You can take the top layer and move it down the stack so it is below others...whatever is drawn on the layer you just moved down will be hidden by whatever covers it from the layers above it.
- You control/manipulate the image layers in the Layers dialog
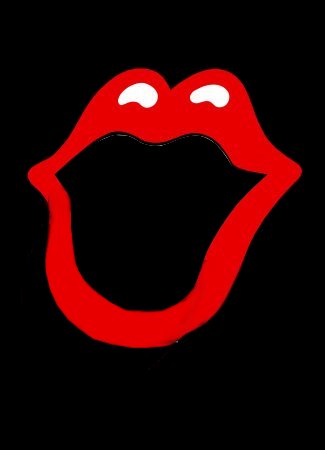
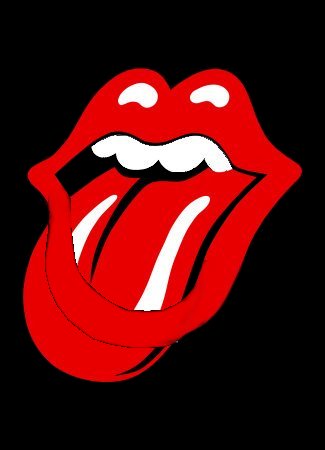
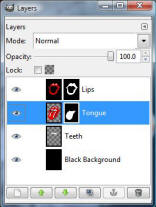
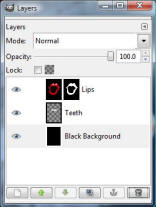
- Here is a picture of the Rolling Stones tongue with four layers (left image) and the associated GIMP layers dialog (right image):
-

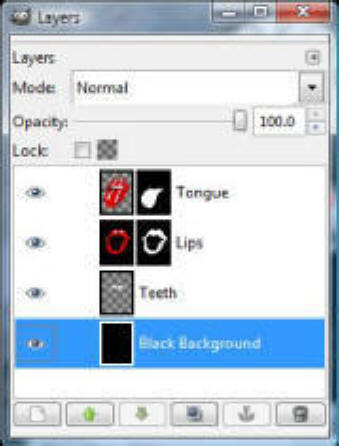
- ...and here are the three image layers by themselves ... view them layered together and you get the above picture:
-


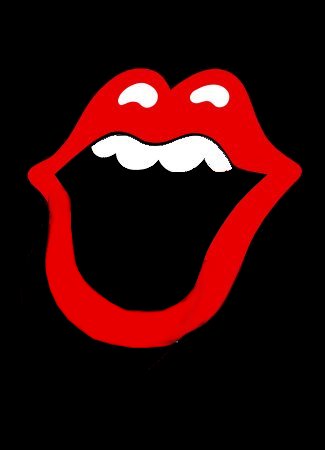
- Move the tongue layer down the stack and the lower lip goes over the tongue:
-
- Delete the tongue layer and you'll just have the lips and teeth:
-
[top]
Zooming in/out
- To zoom in closer to a part of the image:
- Hit Z
- Click in the image on the part you want to zoom in on
- The image will zoom in centered on that part
- Continue clicking until you have the level of detail desired
- To zoom out from a part of the image
- Hit Z
- Hold down CTRL while you click on the part you want to zoom out from
- The image will zoom out centered on that part
- Continue clicking until you have the level of detail desired
[top]
Selecting things
-
One of the most common things you will be doing is selection parts of an image.
- For example, maybe you want to put your head on Arnold Schwarzenegger's body... :)
-
The easiest way to select is using the rectangle or elliptical selection tools.
- The problem with these is they are not precise...you can't use them to select an irregular shape.
- >When you've created a selection, there will be a flowing dashed-line around the shape.
-
You can reverse the selection so that everything else in the layer is selected:
- Select->Invert
-
You can delete the selection, making a hole in your image.
- Hit DELETE or select Edit->Clear
- You can move the selection
- You can transform (rotate, flip, distort, etc) the selection
[top]
Selecting irregular shapes
-
Selecting an irregularly shaped figure is *MUCH* easier if the edges of the shape do not blend with the
surroundings. In other words there needs to be a very high degree of color contrast around the edges of the shape.
- This image has very high contrast around the lips and tongue:
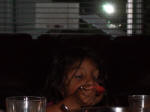
- This image has *HORRIBLE* contrast around the little girl's head:
-
Selecting high contrast shapes- lasso then magic wand (fuzzy select)...
-
To select a high contrast shape, use the lasso selection tool to loosely identify the shape then use the
fuzzy select tool to tighten the selection around the shape:
-
Activate the lasso selection tool (Tools->Selection Tools->Free Select)

- This tool looks like a lasso but is called the Free Select Tool
-
Draw around the shape with the lasso
- If you need to go off the image, that's OK, just sweep around back onto the image
- When you cross the selection line at any point, the selection will be completed
- Use the fuzzy selection tool (magic wand) to tighten the selection

- This tool looks like a magic wand but is called the Fuzzy Select Tool
- Tools->Selection Tools->Fuzzy Select
-
In the GIMP Toolbox, set the Mode to "Subtract from the current selection"
- Click the 3rd from the left button at the top of the Fuzzy Select options section.
-
Click on the image between the shape and the selection outline:
- This will remove that color from the selection.
-
You can adjust the "Threshold" option to control how close the colors must be for the magic wand to match colors for removal.
- The lower the threshold, the more restrictive; only colors very close will be selected.
- The higher the threshold, the less restrictive; a broader range of tints will be selected for removal.
-
Activate the lasso selection tool (Tools->Selection Tools->Free Select)
-
To select a high contrast shape, use the lasso selection tool to loosely identify the shape then use the
fuzzy select tool to tighten the selection around the shape:
-
Selecting low contrast shapes - paths tool
- To select a low contrast shape, you will need to carefully trace out the shape using the Paths Tool
- This tool looks like an ink pen with a string coming out of it.

- Click on the image at the boundary of the shape to place a path point.
- Continue clicking around the boundary to create a connected path of points.
- You can move existing points (to adjust the path) by dragging the point.
- To go back extending the path, make sure you have the end point selected.
- To complete the path, hold down CTRL and click on the 1st point.
- Hit enter to get a selection from the path.
[top]
Moving selections, layers, etc
- To move something, select the Move Tool (Hit M or select Tools->Transform Tools->Move)

- Click and drag to move the selection
- For fine-tuning, small adjustments, make sure the image window is active and use the arrow keys to move the selection one pixel at a time
-
In the GIMPToolbox, Move tool options section you can control what you are moving:
- The layer
- The selection
- The path
[top]
Scaling (resizing: growing or shrinking)
- Activate the Scale Tool (Hit SHIFT-T or select Tools->Transform Tools->Scale)

-
Method 1 - adjust the picture by clicking and dragging on the image
- As soon as you click, the Scale dialog will appear
-
Method 2 - type in the desired dimensions in the Scale dialog
- You can lock aspect by making sure the link icon is connected - this preserves the height/width ratio as you scale so there is no distortion or deformation
- Either method will show you the result ... it doesn't take affect until you click the Scale button
[top]
Transforms (rotations, flips, distortions)
-
Rotate

- Hit SHIFT-R or select Tools->Transform Tools->Rotate
- Method 1: click and drag in the image window to visually rotate
- Method 2: enter the rotation information in the rotation dialog
- In either case you must click the Rotate button in the rotation dialog
-
Flip

- Select Tools->Transform Tools->Flip
- In the GIMP Toolbox, Flip options section, select horizontal or vertical
- Click on the selection in the image window to cause the flip to happen
-
Distortion - Sheer

- Select Tools->Transform Tools->Sheer
- Method 1: click and drag in the image to visually sheer the selection
- Method 2: enter the sheer information in the sheer dialog
- In either case you must click the Sheer button in the sheer dialog
-
Distortion - Perspective

- Select Tools->Transform Tools->Perspective
- Click in the image to active the perspective tool on the selection
- Adjust the corners of the selection to distort perspective as desired
- Click the Transform button in the perspective dialog
[top]
Cropping
- Cropping means that you trim the edges of the image
- Select the Crop Tool

- Mark the part of the image you want to keep by dragging the crop selection rectangle
- Click on the selected/highlighted region (or press ENTER) to accept the cropped region
[top]
Masks
- If you are painting a wall at home, you put masking tape on window and door trim to make sure you don't get paint on them.
- A "mask" in GIMP (or Photoshop) is like putting masking tape over a part of the image to preserve it.
-
To mask something:
- Select the region you want to mask
-
In the layers dialog, right-click on the layer and select "Add Layer Mask"
- In the Add Layer Mask dialog, choose "Selection" and click OK
- You have now "masked" the selected region
-
To get a copy of what you've masked:
-
Copy the selection
- Edit->Copy Visible
-
Create a new layer with transparency
- In the layers dialog, right-click and select "New Layer"
- Set "Layer Fill Type" to "Transparent"
- Give the layer an appropriate name
- Click OK
-
Paste the selection into the new layer
- Edit->Paste Into
- In the layers dialog, right-click on the floating selection layer, select "Anchor Layer"
-
Copy the selection
[top]
How to make a transparent web page background texture
-
Select the desired background color to match/complement your web page:
- Click the background color box.
- In the Change Background Color dialog, select the desired background color.
- Click OK
-
Create a new image:
- Click File>New to open the Create a New Image dialog.
- Set the width to 5 and leave the height 300.
- Click OK
- A new image window titled Untitled-1.0 (RGB, 1 layer) 5x300 will appear
-
Make the texture semi-transparent by adjusting it's opacity:
- Click Dialogs>Layers
- The Layers dialog will open
- Using the Opacity slider, adjust the opacity to make the texture semi-transparent
- Try 35 for starters, but adjust it to the best opacity for your web page through trial-and-error
-
Save the image as a PNG and try it in your page:
- In the image window, click File>Save
- Browse to your web page image folder by clicking Select File Type (By Extension)
- Name the image (example: bgnd.png)
- Click Save
- Click Export in the next dialog
- Click Save in the next dialog
-
Try the image on your page:
- Put a <div> around all your content inside the <body>
- Style that <div> setting background with this PNG image using the repeat option.
- You may need to adjust the opacity to get the desired level of transparency.
[top]
Brushes
- A brush is exactly that...a paint brush
-
The brush controls what is marked on the image using any of the "painting" type tools:
- Pencil
- Paintbrush
- Eraser
- Airbrush
- Blur, smudge, burn tools
- Clone, heal, perspective clone tools
- The GIMP Toolbox options section for each of these tools allows selecting the brush
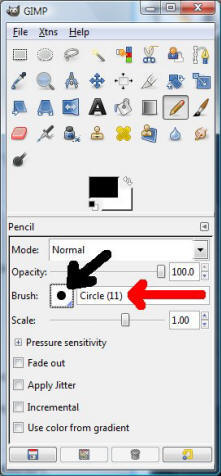
- To the right of the brush icon (black arrow above), the name (including size) of the selected brush is displayed (red arrow above)
- Clicking on the brush icon (black arrow above) opens the brush selection dialog
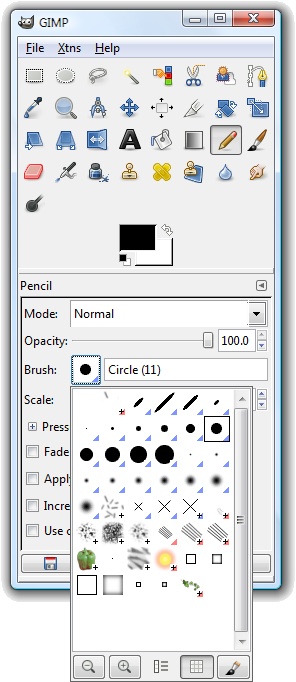
- Play around with brushes to get a feel for the different effects possible
[top]
Create a new layer with transparency
- Open the Layers dialog (CTRL-L or Dialogs->Layers)
- Right-click anywhere in the layers stack area and select "New Layer"
-
In the "Create a New Layer" dialog:
- Give the new layer an appropriate name
- Set "Layer Fill Type" to Transparency
- Click OK
[top]
Create a layer mask from a selection
- First, you need to have something selected :)
- Open the Layers dialog (CTRL-L or Dialogs->Layers)
- Right-click on the layer that holds the selection
- Select "Add Layer Mask"
-
In the "Add Layer Mask" dialog:
- Set "Initialize Layer Mask to" to "Selection"
- Click "Add"
[top]
How to cut out a part of an image and paste it in another image
- Select the part of the image to cut out
- Add a layer mask from the current selection
- Copy the visible part (Edit->Copy Visible)
- Open the image you want to paste this into
- Open the Layers dialog (CTRL-L or Dialogs->Layers)
- Create a new layer with transparency to hold the cut image
- Make sure the new layer is active and paste (Edit->Paste)
- Right-click on the Floating Selection layer, select Anchor Layer
- You are done!
[top]
How to give an image a transparent background
- Select the part of the image you want to have a transparent background
- Add a layer mask from the current selection
- Duplicate the background layer
- Merge the duplicated layer down
- Save the image as a PNG
[top]
How to take a snap-shot of a window on the desktop
- Create a new image: File->New
- Ensure the image size is sufficient to hold the window you are taking a snap-shot of
- Activate the window you want a snap-shot of
- Hold down ALT and hit PRTSCN
- Activate the GIMP image window
- Paste into GIMP (CTRL-V or Edit->Paste)
-
Anchor the pasted image layer to the background layer
- Activate the layers dialog (CTRL-L)
- Right-click on "Floating Selection" layer, select "Anchor Layer"
-
Shrink the image to the pasted image:
- Select the pasted image
- Image->Fit Canvas to Selection
[top]
Turn a person into a zombie
Adapted from http://www.gimpusers.com/tutorials/turning-people-to-stone.html
- The starting image and the final result.
- Open the image showing the person you want to turn into stone. Example
-
Cut the person from the background:
- Select the Paths-tool (hit B or Tools->Paths)
- Set points along the outline of the person
- Zoom in sufficiently to see the outline detail
- Follow the edge of the outline carefully
- To adjust a path point, drag the point
- >To resume adding points to the path, select the end point and continue
- To complete the path, hold CTRL and click on the 1st point
- Click here to see an example
- Hit ENTER to get a selection
- Add a layer mask
- Open the layers dialog (CTRL-L or Dialogs->Layers)
-
Right-click on Background layer, select "Add Layer Mask"
- Choose "Selection" and click "Add"
-
Add a new layer, fill it with black:
- Ensure the foreground color is black
-
In the Layers dialog, click the button at the bottom left:
- Name the layer "Black"
- Select "Foreground color" and click OK
-
Move this new layer to the bottom of the layers stack:
- Click the down arrow at the bottom of the layers dialog
- The person will now be visible on a completely black background
- Click here to see an example
- Get a selection of the head itself:
-
Make a copy of the path used to cut the person:
- Open the Paths dialog (Dialogs->Paths)
-
Rename the current (Unnamed) path to "Person":
- Right-click on the path, select "Edit Path Attributes"
-
Duplicate the Person path:
- Right-click on the path, select "Duplicate Path"
- Name the new path "Head"
-
Use the new path to select the head
- In the layers dialog, activate the Background layer
- Ensure the Face path is active in the Paths dialog
- Adjust existing points from the body to outline the neck
- To delete a point, click on it and hit BACKSPACE
- To add a point, hold down CTRL and click on the path line
- Click here to see an example
- When done, hit ENTER to get a selection
-
Create a new layer with just the head in it:
- Select Edit->Copy Visible
-
In the layer dialog, right-click, select "New Layer":
- Name the layer "Head"
- Select Transparency and click OK
- Select Edit->Paste Into
- Right-click on the new "Floating Selection" layer, select "Anchor Layer
- Press M to select the move tool so the path will disappear
-
Make a copy of the path used to cut the person:
-
Make the head gray-toned:
- Activate the Head layer
- Select Colors->Hue-Saturation:
- Set the Saturation option to -75
- Select Colors->Desaturate, Lightness option, click Desaturate
- The head will now be gray-tone; click here for example
-
Make the left eye stone:
- Activate the Head layer
-
Using the path-tool, create a nice selection around the left eye
- Zoom in as necessary; click here for example
-
Get a clone of medium skin tone:
- Select Tools->Paint Tools->Clone
- In the GIMP Toolbox dialog, select a soft brush: Fuzzy Circle (17)
- Hold down CTRL and click on the region of skin with the tone you want for the eye
- Release CTRL
- Add an empty layer with transparency named "LeftEye"
- On this layer, paint over the eye selection with the cloned skin tone
- Click here for an example
- Smooth the boundary of the eye, blending with the eye lids:
-
Add some texture to the eye:
- Select Filters->Blur->Gaussian Blur: 8 px (horiz/vert) and IIR
- Deactivate the selection (SHIFT-CTRL-A)
- Select Filters->Noise->HSV: 3/0/0/15
- Select Filters->Blur->Gaussian Blur: 1 px
- If needed use the smudge tool w/a small soft brush to remove any hard/harsh edge around the eye
- Click here for an example
-
Make the right eye stone:
- Repeat the steps used for the left eye on a new layer named "RightEye"
- Click here for an example
-
Merge the two eye layers into the Head layer:
- In the layers dialog, right-click on each eye layer, select "Merge Down"
- You should now have 3 layers: Head, Background, and Black
-
Make the head pale with sufficient contrast to see the basic contours of the face:
- Select Colors->Brightness-Contrast: 90/50 ... adjust contrast as needed
- Click here for an example
-
Add the stone texture to the head:
- Select File->Open as Layers, select "granit.jpg" ... click here for example
- Name the new layer "Texture"
- Make the stone gray: select Colors->Desaturate
-
Move/rotate/scale the Texture layer so it covers the head:
- Hit M to move
- Hit SHIFT-R to rotate
- Hit SHIFT-T to scale
- To see the outline of the head through the texture layer
- In the layers dialog, right-click on the Head layer, select "Alpha to Selection"
- When done, select the Texture layer & hit SHIFT-CTRL-A
- Activate the Head layer, right-click and choose "Alpha to Selection"
-
Activate the Texture layer, right-click and choose "Add Layer Mask"
- Choose Selection and click OK
- Deselect: SHIFT-CTRL-A
- The head will now be completely stone...click here for example
-
Blend the stone texture with the base layers of the face to see the face contours:
-
In the layers dialog:
- Set the layers Mode to "Multiply"
- Set Opacity to 60
- Select Filters->Enhance->Sharpen: 45 px
- Click here for example
-
In the layers dialog:
-
Add some depth to the face:
- Duplicate the Head layer and move the duplicate to the top of all layers
- Select Colors->Brightness-Contrast: -90/+50
-
In the layers dialog for the Head copy layer:
- Set the layers Mode to "Overlay"
- Set Opacity to 60
-
Give the face a bit of a yellow-green tint:
- Select Colors->Color Balance: Midtones, 45/45/-45
- Click here for example
-
Remove the stone texture from the teeth:
- Activate the Background layer
- Using the path-tool, outline and select the teeth and mouth
- Activate the Texture layer
- Set the foreground color to black
- Select Tools->Paint Tools->Paint Brush
- Paint over the mouth/teeth selection with the black foreground color to remove the stone texture leaving grayish teeth
-
Add a fun background:
- Select File->Open as Layers, choose "graveyard.jpg"
- Name the new layer Graveyard
- Move the image to the top left (hit M and drag)
- Scale the image to fill the picture (hit SHIFT-T)
- In the layers dialog, move the Graveyard lay down just above the Black
- Click here for example
- You now have a zombie! :)
-
Other ideas:
- At steps 5 & 6 (Making the eyes stone), give the eyes a burning look:
-
Instead of cloning skin to cover the eye, try applying a lava filter:
- Filters->Render->Lava: Roughness 3 and a red/yellow gradient
-
Instead of cloning skin to cover the eye, try applying a lava filter:
- Add fangs :)
- At steps 5 & 6 (Making the eyes stone), give the eyes a burning look:
[top]
How to fade-out the edge of an image
- Select the image or the part of the image for which you want to fade the edges:
- Ctrl-A to select the entire image...
- ...or use any of the select tools.
- Shrink the selection ... more shrinking = more fade-out: :)
- Select->Shrink
- Make sure "shrink from image border" is selected
- Play around with the number of pixels to shrink by...try 10 for starters
- Feather the selection by more than you shrunk it:
- Select->Feather
- For starters, try double the number of pixels you used for shrinking
- This will give you the fade-out effect between the selection and its surroundings
- The larger the surrounding area, the greater the fade-out effect
-
Delete the surrounding area:
- Select->Invert (selects the surrounding area)
- Edit->Clear (or just hit the DELETE key)
- Make sure you save as a PNG (it is the only format that handles "alpha channel" effects)
[top]